TEMPERATURE SENSOR (DS18B20)
")
-
Product Code:
SG - DS18WF Availability:
15
-
Price:
S$ 9.90
Qty
DS18B20 Temperature Sensor
The DS18B20 is quite versatile. It can be powered through the data line (so called “parasite” mode, which requires only 2 wires versus 3 in normal mode), it operates in a 3.0V to 5.5V range, measures Temperatures from -55°C to +125°C (-67°F to +257°F) with and ±0.5°C Accuracy (from -10°C to +85°C). It converts a temperature in 750ms or less to a up to 12 bits value.
Another cool feature is that you can connect up to 127 of these sensors in parallel, and read each individual temperature. Not sure what I’d do with that, but the ability to combine one or two, for example for the temperature of your fridge and freezer, is a nice option, specially when other pins of your Arduino are being used for other things …
Harware
- At least one DS18B20 digital temperature sensor (from Amazon, AdaFruit or eBay for example)
- An Arduino (I used an Uno R3 – for example from Amazon, eBay, Arduino or AdaFruit)
- 3 jumper wires
- Breadboard (see our Breadboard article)
- USB cable for the Arduino
The USB cable is of course only needed to program and power the Arduino during development.
When we run the Arduino computer independent you might want to look for a suitable power supply.
Wiring Arduino and DS18B20
The wiring, this is the beauty of a 1-wire interface, is super simple.
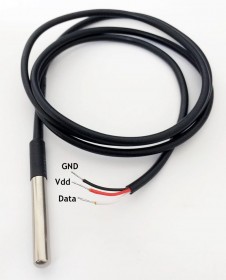
The GND pin of the DS18B20 goes to GND on the Arduino.
The Vdd pin of the DS18B20 goes to +5V on the Arduino.
The Data pin of the DS18B20 goes to a (digital) pin of your choice on the Arduino, in this example I used Pin 2.
The only thing we need to add is a pull-up resistor of 4.7 KΩ. I have seen ther values, but it seems this is the most commonly used value.
The wiring presented below is the regular way of wiring the DS18B20 with your Arduino.
Make sure that you very line 10 and line 65 in the Sketch below to match your data pin and power mode!
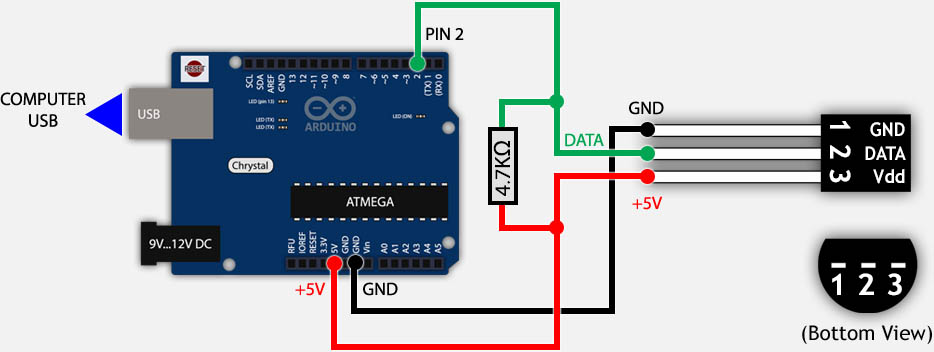
DS18B20 and Arduino wiring
Below a picture of my test setup … it’s really easy.

Arduino and DS28B20 setup is super simple …